
Thank you > > http://goo.gl/wzZwa
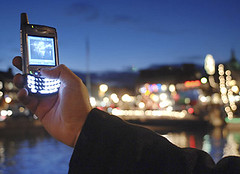
Here's a neat little lighting exercise that has nothing to do with off-camera flash.
When we talk about balancing light around here, it usually means balancing ambient with flash. But getting a good photo of holiday lights involves a different kind of light balancing: Continuous ambient with fading ambient.
You don't need a high-end camera for great results. You can use a very inexpensive digital camera and do just fine. You don't even need flash. It all comes down to what time of the day you shoot. And a couple of other little tricks.  Photo by Troy McCullough (see a larger version)
The problem with 98% of the photos of Christmas lights is that most people wait until way too late to start shooting. After it gets completely dark, you can either have the lights or the surroundings properly exposed. But not both.
Conversely, if you were to shoot the lights in the middle of the day, they would not show up at all. The trick is find the sweet spot (actually there is a whole range of sweet spots) where the ambient light and the Christmas lights balance.
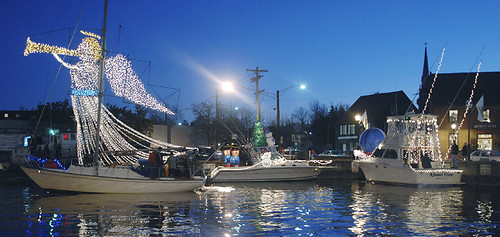 Photo by David Hobby, Baltimore Sun
Understanding this will ensure that your photos are way better than those of your neighbors. After all, isn't that what Christmas lights are really about?
How to Do It:
1. Arrive early. The best time to shoot is before it gets totally dark. More specifically, get there before what looks like
2. Compose your photo in such a way as to include as much sky as possible in the background. Shooting from a low position can help. Even better: If you have your choice of shooting direction, shoot into the afterglow of the evening sky.
3. Once you get your picture framed, set your camera's white balance for "tungsten," as if you were shooting indoors without flash. All of those little lights are tungsten balanced. As a bonus, the tungsten setting will turn your afterglow sky royal blue once your light balances out. The sky will look great - even if it is a cloudy evening. And your lights will gleam crystal white -- or whatever color they are supposed to be.
4. A light (or reflective) foreground, like snow, or a puddle (or the roof of a car) can give nice foreground interest. See what you can find.
5. Use a tripod or a beanbag to steady your camera. You'll be shooting in the range of a quarter second to a full second at twilight. If shooting with a phone or PDA, use both hands to brace the phone against something solid.
6. Now, wait for the light to happen.
Shoot a test shot every minute or so. At first, you'll be exposing for the sky and the lights will appear unimpressive. Check the back of your camera after each shot to watch the Christmas lights appear to "come up" as the ambient light level goes down. Your eye is constantly adjusting to compensate for the dropping light levels, but the changes will be happening nonetheless. Your camera will record them differently from the way that you eye sees them (you can see a much greater contrast range) so shoot and chimp.
 Photo by Michael DeHaan
Somewhere in between sunset and full dark, the Christmas lights and the ambient light will start to mix beautifully. You'll have about a 10-minute window which will give you a nice series of subtly different lighting variations. Remembering to keep your camera as still as possible, shooting lots of frames through the mix light. Ones and zeros are free, so don't be stingy. You do not have much time. You can delete the duds (or blurred photos) later.
Incidentally, this time of day is when the architectural photographers make the big bucks. And they are smart enough to tell everyone in their subject building to leave the lights on that night, too.
Your light will fade very quickly. You will know it is gone when your photos start looking like the "bad light" photos you used to take.
Now, put your camera away. You still have a few minutes to enjoy the scene with your eyes. The human eye has the remarkable ability to compress a large dynamic range into a scene your brain can process. Just relax, soak it in and think about all of the shopping you have left to do.
This is one of the few times that both shooting pictures and enjoying the moment do not conflict with each other.

Tips for Taking Better Photos of Christmas Lights
December 3, 2008 — hankinslawrenceimages
Thank you > > http://goo.gl/naeJv
Here’s a repost of one of our earliest blog posts written last December. At that point, we only had about 5 subscribers, so figured it was worth reposting it this year. – Patty
Outdoor Christmas lights can be one of the toughest scenes to photograph well. All too often, photos come out too dark, too light, blurry, fuzzy or just plain don’t work. The combination of bright lights and dark backgrounds can make correct exposure a challenge.
One of our neighbors puts up an extensive display of lights each year, which made it easy for us to take several photos for us to use as examples.
Here’s a few tips that will help you take better photos this holiday season.
1. Turn off the flash. Most on-camera flashes are designed to light up the area 4-6 feet directly in front of the flash, and then darken down hat is beyond that range. Most holiday light displays are more than 4-6 feet away. So what happens when you don’t turn off the flash is that you light up whatever is directly in front of you (a wall, a tree, the lawn, or people) and put the holiday lights into darkness. Your camera may complain with a bunch of beeps) about not using the flash in the dark, but this is one time when it’s best to override the automatic functions and turn off the flash.
As you can see from this photo, the flash lit up the street sign and the license plate on the car while darken down the rest of the photo.
 (c) 2007 Patty Hankins.
2. Increase the ISO or film speed. A higher ISO will let you have shorter exposure times. If you are using a film camera, try using ISO 400 film. For a digital camera, reset the ISO setting to at least 200 or 400 (on some digital cameras, setting at ISO 400 or above results in very grainy pictures).
At ISO 100, the shutter speed is way too slow, resulting in a fuzzy photo of the lights.
(c) 2007 Patty Hankins.

At ISO 400, things are looking a little better.

(c) 2007 Patty Hankins.
3. Brace Your Camera. Even with a higher ISO, you’re likely to be shooting exposures longer than a person can easily hold a camera perfectly still. And any camera movement shows up in the pictures as blurry lights. The best thing to use is a tripod. If you don’t have a tripod, place your camera on a table object, like a wall or a table, and use the self-timer to take the picture. If there’s nothing available to put your camera on, try leaning against a tree or a pole to help keep yourself steady.
Here’s the neighbor’s lights photographed with the camera on a tripod.

(c) 2007 Patty Hankins.
4. Set Your Camera Before You Go Out. If you’re just planning on photographing lights one evening, adjust your camera settings before you leave home. It’s much easier to set everything in the light, when you have your manual close at hand if you need it – rather than in the dark somewhere, with gloves or mittens on (or with very cold fingers).
5. Dress Warmly. It’s easy to get cold standing around taking photos at night. Remember, photography is supposed to be fun, and it’s hard to have fun when all you can think about is how cold your fingers and toes are.
6. Take Lots of Photos. Be sure to take lots of photos of the lights, including some from different exposures and compositions. Your first shot may not be your best one. Besides, if you’re shooting with a digital camera, you can always delete the ones you don’t like.
We hope these tips will help you take some photos that will help you remember the holiday season with joy rather than frustration over bad photos.


No comments:
Post a Comment